Top quality product pictures is crucial for attire ecommerce. For a lot of clients, you want greater than only a nice product description—your photos will decide whether or not or not they purchase your product.
However important doesn’t must imply costly. The distinction between skilled and beginner is just expertise.
When you’ve got a watch for pictures and a modest price range, learn on. This information walks you thru find out how to {photograph} a bit of clothes, with pictures suggestions to remember throughout your shoot.
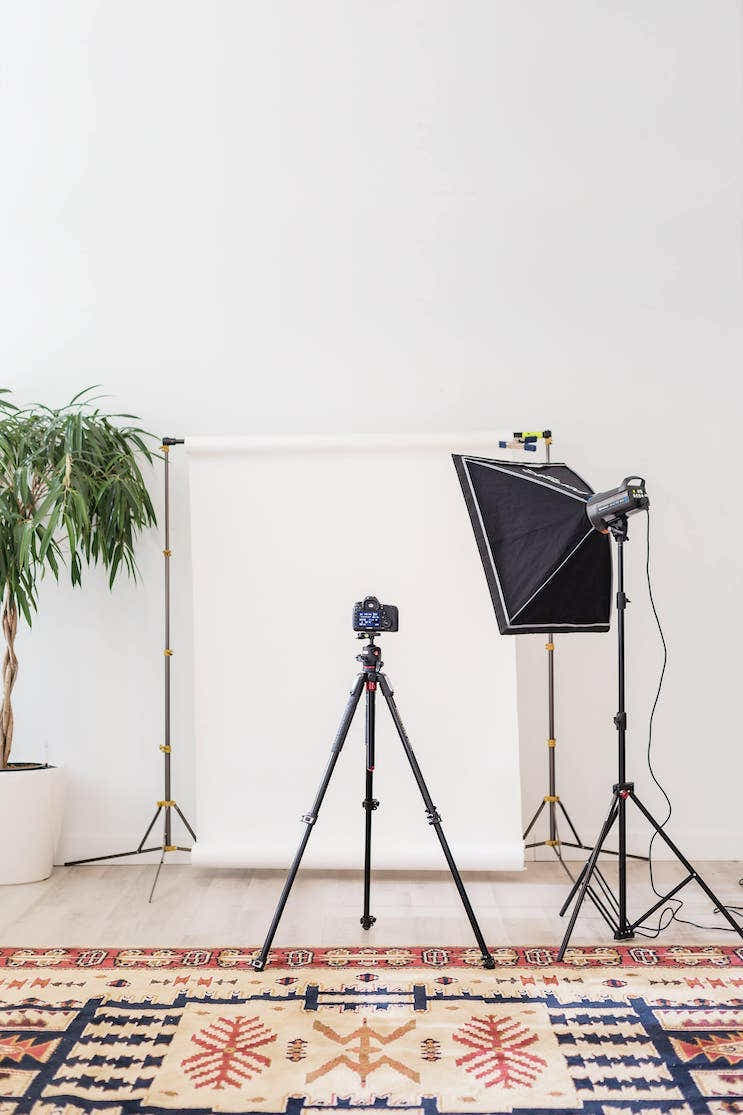
Clothes pictures gear
The gear you utilize in your shoot relies on your price range. You possibly can hold spending low by shopping for just a few low-cost gadgets. Or you should purchase extra dear gear in order for you particular lighting or shows.
Let’s have a look at the gear you’ll want on your clothes pictures shoot:
Digital camera
You don’t want the most costly DSLR digital camera to take photos of your garments. New clothes retailers can handle shoots with a smartphone additionally. Use no matter digital camera you may have helpful, be it a digital digital camera, some extent and shoot, or a smartphone. When you’ve got a price range for a brand new digital camera, take a look at this thread on Quora that discusses the finest cameras for product pictures.
Tripod
A tripod eliminates digital camera shake—unintentionally shaking your digital camera throughout a shoot. (It occurs to everybody.) Merely connect your digital camera to the tripod, body the product, and take the photograph. It’s simple. Tripods will not be a one-size-fits-all factor, so discover a tripod that’s suitable along with your digital camera.
Lighting supply
You want mild to take photographs of your garments. When you’ve got a room with a window that welcomes pure mild, you’ll be able to shoot there. In case you don’t, you’ll want synthetic lighting, like a softbox. You will discover synthetic lighting merchandise on Amazon.
Observe: don’t get blended up in all of the pictures lighting kits you discover on-line. You don’t want the LED lights and reflectors immediately. Hold your setup easy, and when you get snug behind the digital camera, you’ll be able to introduce new components to your shoots.
Foam boards
Whether or not you’re taking pictures with window or synthetic mild, there’s all the time a shadow facet of the product. It’s usually too darkish to supply an excellent picture. You possibly can place a white foam board to replicate mild again into the shadow to brighten it up.
Clamps or tape
In case you resolve to shoot on a desk, you’ll need tapes or clamps to maintain your foam boards and sweeps in place.
Backdrop
Get a white background on your shoot. In case you’re going to shoot numerous merchandise without delay, take into account shopping for a paper white sweep. Paper sweeps are enormous rolls of white paper. You should use them to create white backgrounds to {photograph} your clothes on. If the sweep will get soiled, you’ll be able to minimize the soiled piece and roll out a brand new clear one.
An alternative choice to white sweeps is a poster board. You will discover them at your native drug retailer or on-line for affordable.
Model or mannequin
Mannequins are a nice-to-have in clothes pictures. They’ll price anyplace from $90 and better. An alternate is asking a pal or member of the family to mannequin the clothes for you.
The choice is a flat floor or desk to take photographs on. It’s widespread for manufacturers taking pictures flat lay clothes. This implies your clothes is laid on the floor and also you’re taking pictures from above at a 90-degree angle.

Free Information: DIY Product Images
Discover ways to take stunning product photographs on a price range with our free, complete video information.
Get our DIY Information to Stunning Product Images delivered proper to your inbox.
Virtually there: please enter your electronic mail beneath to realize on the spot entry.
We’ll additionally ship you updates on new instructional guides and success tales from the Shopify publication. We hate SPAM and promise to maintain your electronic mail deal with protected.
7 steps to {photograph} clothes on your on-line retailer
Now that you just’ve acquired your gear, let’s have a look at find out how to take photographs of your garments:

Shopify Academy Course: Product Images
Photographer Jeff Delacruz shares how one can create your individual photograph studio and take stunning product photographs for lower than $50.
1. Put together your clothes
Your merchandise ought to look their very best in your photos. It’s an unlucky undeniable fact that clothes can turn out to be wrinkled, creased, and start to look worn from storage and transport. Clothes samples face a very tough time, as they typically cowl numerous miles and will not have been completely constructed to start with.
Getting ready clothes to be photographed is an important place to begin for photographing your merchandise, but many photographers skip this step and depend on Photoshop or free photograph enhancing software program to repair wrinkles, stains, and different seen defects. Don’t do this. Photoshop isn’t magic: it takes time and experience to grasp superior enhancing methods, and extreme enhancing dangers compromising picture high quality.
Attempt to seize your garment in a state as near excellent as attainable and use Photoshop solely so as to add closing touches and shade correction.

Totally study your product from high to backside, inside and outside. Are there any tags, stickers, or different forms of figuring out supplies that have to be eliminated? Accomplish that. Has the product turn out to be wrinkled or creased throughout storage? Iron or steam it. Restore damages and take away distractions; for instance, use lint rollers or tape to take away mud and strings.
2. Arrange your photograph studio
With just a few gadgets, you’ll be able to flip practically any room with house right into a pictures studio. You will get by with a digital camera, tripod, white wall, C-stand, duct tape, and pure mild. When you’ve got slightly extra to spend and need management over when and the place you shoot, it’s price investing in just a few extra items of kit.

Ensure to clear all litter out of your space. You’ll need a clear house to remain organized and do the most effective work.
Backdrop
All the time use a white or mild gray backdrop to stop distractions and make sure you seize colours as precisely as attainable. Seamless rolls of white paper are ideally suited, low-cost, and available at any pictures provide retailer. When you’ve got one, get a backdrop lighting package for beneath $100.
Sweep the roll to the ground in order that it’s curved, stopping creases and distracting shadows, and fasten it with tape.
Utilizing a stand will provide you with extra flexibility in the place you place your background, permitting you room to maneuver across the studio. In case you’re on a bootstrapped price range, you’ll be able to tape the seamless roll to the ceiling or a wall.
Place your product on a mannequin or model in the midst of the backdrop and straight in entrance of the place your digital camera can be.
Digital camera
Your digital camera is an important a part of your product pictures, however don’t make the error of assuming it alone will decide your success. It’s only one piece of the puzzle, and also you don’t must put your complete price range into it. We suggest you utilize a DSLR that has, at a minimal, handbook publicity and aperture settings, or utilizing a really cheap different proper at your fingerprints: your smartphone!
Use a tripod. The soundness will get rid of digital camera shake and guarantee your pictures are constant, whereas additionally releasing you to make use of your palms on different duties. You don’t have to spend some huge cash on a tripod, nevertheless it’s important that you just use one.
Place your tripod and digital camera in order that it straight faces the product. More often than not, you’ll not transfer the digital camera all through the shoot. For various angles, transfer the product.

Lighting
Pure window mild is a cheap and prime quality mild supply for any attire photographer. When you’ve got a big window and considerable pure mild, nice! It could be all you want. Nonetheless, you probably have the means, we extremely suggest that you just lease or spend money on an easy-to-use lighting package.
Having synthetic lighting gear at your disposal will allow you to shoot when there merely isn’t sufficient mild coming in by way of the window. The added versatility can dramatically enhance your effectivity, whereas constant lighting helps you set knowledgeable customary. For a single mild setup, you’ll want a light-weight head, softbox, C-stand, battery pack, and pocket wizard.
The “mild head” is what you would possibly consider as the sunshine itself. We propose you begin with a mono strobe mild head, known as a “monolight.” This can be the most costly portion of your package—probably dearer than your digital camera—so take a while to analysis and discover your finest long-term match.
A softbox is critical to diffuse mild and seize your product in an evenly lit and interesting method. The C-stand will maintain your mild head and the softbox round it. A pocket wizard will sync your digital camera and the sunshine, basically turning your mild head into its flash.
3. Place lighting
In case you’re utilizing pure mild, place your product close to a window the place it will possibly get even, oblique mild. In case you’re utilizing a monolight setup, beneath is a diagram of a hen’s-eye view of an efficient lighting setup.

Place one mild supply and softbox or umbrella at a 45-degree angle to the product in order that the lighting on the product is gentle and even all through. Hold your digital camera straight in entrance of your topic. When you’ve got positioned the product too near the background, it’s possible you’ll get some shadowing. If this occurs, merely transfer the topic farther away from the backdrop to attain a clear, white background. Set your mild supply’s energy to about half.
Manually exposing your picture correctly is normally only a matter of utilizing your digital camera’s mild meter, which you could find by trying by way of the viewfinder and adjusting settings to make the meter notches attain 0.
It isn’t so easy if you’re utilizing a strobe, since there is no such thing as a lighting for the digital camera to learn till the flash fires.
Begin along with your shutter velocity set at 1/200 or beneath and your aperture set at f-11 or increased. From there, you will have to take take a look at pictures and tweak your digital camera settings to attain optimum publicity and focusing.
Permit time for recharging between flashes. Relying on the energy of your battery pack, your mild supply might not hearth on time when you shoot too shortly.
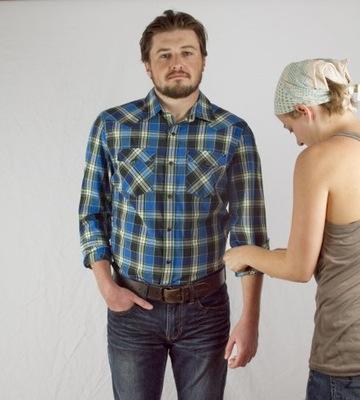
4. Styling
Fashions
Fashions are fascinating as a result of a stay physique helps a buyer relate to your product and provides a better diploma of professionalism, however it will possibly additionally make for an unpredictable course of. Fashions make clothes come to life, however professionals are extraordinarily costly.
Mannequins
Mannequins are nice as a result of they’re reasonably priced, constant, and simple to work with.

Take time to fashion your product on the model; in case your garment seems to be too massive, strive becoming it nearer to your model by pinning it and tucking it till it suits correctly.

In case you’re involved a model could also be distracting or cheapen your product, you need to use the ghost model approach in post-production processing. A number of further pictures of every product will will let you take away the model out of your product photos and current a 3D picture that demonstrates form and match.
Flat lay
“Flat lay” refers to arranging objects on a flat floor and taking the photograph from above. It’s additionally known as hen’s-eye view. Flat lay pictures is a good different to mannequins and fashions and may also help you create stunning product photographs that promote.
It’s a method used loads for social media photographs. However you need to use it on your web site content material as effectively.

Flat lay is an effective choice for normal clothes that folks can see themselves in:
- T-shirts
- Sweaters
- Blue denims
- Sport pants
- Beanies
- Socks
Extra complicated attire like sports activities or out of doors gear might require a mannequin or model to indicate the match. Take a look at flat lay along with your merchandise and see the way it works.
Hanging attire
Hanging attire is used to indicate merchandise at eye stage. It’s price range pleasant and is quicker than the opposite methods talked about above. Hanging attire includes hanging clothes on a hook towards a wall or white background, then taking the photograph.

Capturing hanging attire works finest for items fabricated from light-weight supplies, like silk. As soon as the clothes is ready, it gained’t wrinkle.
5. Set your digital camera
In case your digital camera settings are fallacious, then no quantity of Photoshopping experience will be capable of make your photos look skilled. Ensure you perceive ISO, aperture, and white stability earlier than you {photograph} your merchandise.

ISO
Ensure your ISO isn’t any higher than 600–640. Greater ISOs produce distracting “noise” or “grain,” which is grayish or coloured speckles that make images look extra filmic. The upper you go, the more serious the noise can be. At increased ISOs the digital camera can’t seize as a lot sharpness, so particulars start to look gentle. Utilizing a tripod will will let you hold your ISO at 100 or 200 for optimum readability and sharpness.
Aperture
Aperture, which is represented by the f variety of your digital camera settings (e.g. f-16, f-2.8), controls focus. Typically, the bigger the aperture quantity the extra facets of the picture can be in full focus. Ensure to set your aperture increased than f-11; this can enable for all facets of your merchandise to be in full focus.

White Stability
Have you ever ever checked out a photograph that appeared prefer it was taken by way of a blue or orange filter? The white stability was most likely off. Mild sources have completely different warmths, creating what’s often known as a shade forged, which makes it troublesome on your digital camera to find out true white. Your white stability setting controls how the digital camera interprets the colours it data.
There are lots of various kinds of mild sources, however the most typical are tungsten, fluorescent, LED, and pure daylight.
You possibly can set your white stability particularly in keeping with the kind of mild supply you’re utilizing or set your white stability to Auto and let the digital camera resolve. No matter you select, don’t overlook about white stability or it’s possible you’ll end up hard-pressed to try to recreate correct colours in Photoshop.
6. Take the photograph
Finally, it’s lastly the second you’ve been ready for! Direct your digital camera at your topic and press half means down in your shutter launch button, enable your digital camera to focus in your topic, after which snap the shot. Alter your digital camera settings all through the shoot when you discover your photos want kind of mild. The extra you shoot, the extra instinctive your changes will turn out to be.

Shoot as many photos as attainable. You might wish to shoot the back and front, 45-degree angles, left and proper sides, and any particulars. Take a look at some close-up pictures to spotlight any particular particulars about your garments.
Embody a number of photographs for all of your attire. When you’ve got embroidery or bedazzle, present it off! Take close-ups of what makes your product particular. It’ll talk the identical worth to consumers who’re about to purchase it.
The extra pictures, the higher. You need numerous choices to pick out your closing photos from, and having extra photos per product in your web site has been demonstrated to extend gross sales. Clients will be capable of belief their impressions of the product if it’s backed up in a number of images from a number of angles.
7. Finalize in publish
After taking pictures, it’s time to put together your product photos for the online. The objective of post-production processing is to make your photos look as skilled as attainable whereas sustaining optimum efficiency.
That is the only and most helpful step to outsource, since digital property are simply transferable and the time and value financial savings are vital.
In case you would slightly do it your self, it’s best to guarantee your post-production course of addresses alignment, cropping, background removing, and shade correction so as to preserve a constant {and professional} look. Hold a report of your processes so you’ll be able to develop a regular set of specs for each taking pictures and enhancing.
Alignment
Make it possible for your merchandise are all the identical measurement and are centered inside every picture. You need the entire angles, corners, and edges of your merchandise to line up in relation to 1 one other. The simplest means to make sure that your alignment is spot on is to create pointers in a Photoshop template.

Cropping
Very like alignment, it’s best to crop product photos identically so your clients have a seamless on-line procuring expertise. In case you use pointers for alignment, then cropping persistently and sizing photos in keeping with your web site’s picture specs ought to be no drawback.

Background
We used a white background, which is a really helpful follow and even required by some marketplaces. You possibly can take it a step additional and fully get rid of attainable distractions by eradicating the background. Eradicating the background will enable you extra flexibility in internet design and modestly lower file measurement.
Coloration
Even with cautious consideration to white stability, some colours—like neons, reds, and pinks—are troublesome to {photograph} appropriately in digital camera and sometimes have to be tweaked in Photoshop.
Inaccurate representations of colours can depart clients annoyed and dissatisfied, so take just a few additional minutes to make sure that the colours of your clothes are correct. The underside line is that you really want the shopper to see precisely what they are going to obtain within the mail ought to they order your product.
There are a variety of the way to tweak colours, so get to know Photoshop’s choices and select your favourite device. After you may have mounted the colours, make certain to transform your photos into SRGB format so completely different browsers, laptop screens, and web sites gained’t change the correct colours you labored so exhausting to create on your clients.
Enhancing your attire pictures shoots
Doing it your self is a giant problem. It gained’t be excellent the primary time, however that’s OK. Your objective ought to be to enhance with each shoot and to take the very best product photos. Higher product photos imply extra gross sales and extra alternative for individuals to take pleasure in your product.
Keep in mind the seven steps to taking stunning attire product pictures and also you’ll be positive. Put together your product, construct your studio, place your lighting, fashion your product, set your digital camera, shoot, and ideal your photos in post-production processing. In case you observe these steps, you should have prime quality product photos you might be pleased with.
For extra, take a look at A Image Is Value a Thousand Gross sales: Learn how to Take Beautiful Product Pictures For Learners and Learn how to Begin a Clothes Line: Secrets and techniques from a Undertaking Runway Designer
.
Illustration by Until Lauer
Able to create your small business? Begin your free 14-day trial of Shopify—no bank card required.
Clothes pictures FAQ
How do I {photograph} garments?
For clothes pictures, you’ll wish to shoot at a excessive f-stop, between f-8 and f-11. It’ll assist focus solely on the attire and spotlight its finest particulars. You’ll additionally wish to set your shutter velocity to round 1/125.
How do I create a photoshoot for a clothes line?
- Get the suitable pictures gear
- Put together your clothes
- Arrange your photoshoot studio
- Place lighting
- Fashion your garments
- Set your digital camera
- Take the photograph
- Match it in publish
How do I take photos of t-shirts?
How do I take good photos of garments with an iPhone?
Take your photograph close to a window with pure mild. Use a stable white background and ensure nothing else is within the image. Arrange your clothes, be it flay lay or with a mannequin, and take the photograph. You possibly can all the time edit the picture with software program after taking it.