Think about spending hours making a Google Sheet to share along with your staff, solely to seek out {that a} staff member by accident deleted an vital column, row, cell, or, even worse — a complete sheet.


![→ Access Now: Google Sheets Templates [Free Kit]](https://no-cache.hubspot.com/cta/default/53/e7cd3f82-cab9-4017-b019-ee3fc550e0b5.png)

That may be irritating. Nonetheless, it is completely preventable in case you lock cells in Google Sheets.
Because it seems, with only a few clicks of a mouse, you’ll be able to lock cells and full sheets in Google Sheets — that means, you and your staff can work on the identical sheet with out hindering the following individual from finishing their assigned duties.
On this put up, we’ll go over methods to lock and unlock cells in Google Sheets.
Desk of Contents
The Advantages of Locking Cells in Google Sheets
Google Sheets permits customers to lock cells from enhancing, which implies you’ll be able to shield your Sheet from any potential accidents, together with enhancing and deletion.
You may as well shield vital information and calculations, so you’ll be able to relaxation straightforward figuring out the formulation in your Sheet are appropriate and correct.
The flexibility to lock cells in Google Sheets comes with a wide range of advantages.
Not solely are you able to lock cells from enhancing, however you can too management which staff members can edit your doc — proper right down to the very cells these staff members are allowed to govern.
That is extraordinarily useful if a number of staff members are engaged on the identical Sheet without delay. You may as well copy permissions from different sheets, when you have locked cells in different Sheets.
Let’s check out the steps to lock cells in Google Sheets.
Methods to Lock Particular Cells in Google Sheets
Locking particular cells in Google Sheets is a straightforward process. Right here’s methods to do it:
1. Proper-click on the cell you wish to lock.
After opening a brand new Google Sheet (or a Sheet you may have already been working in), right-click on the cell or cells you wish to lock.
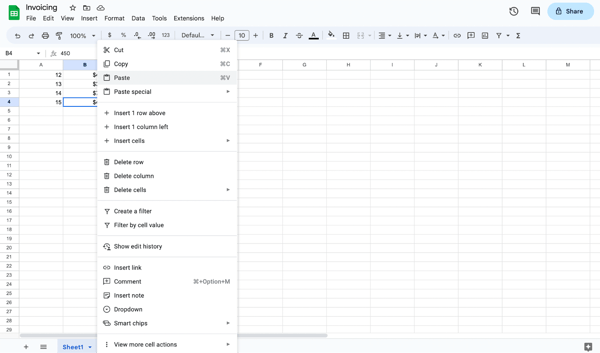

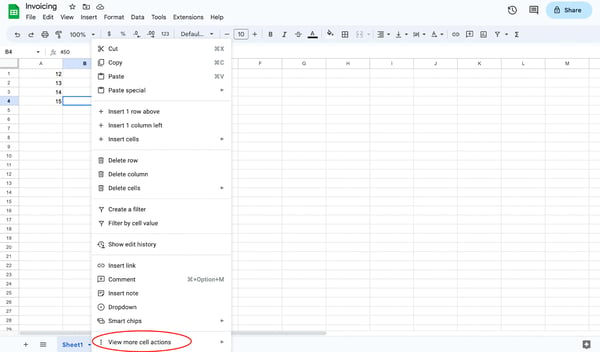
2. Hover over “View extra cell actions.”
This selection is listed on the backside of the dropdown menu.
Relying on the place your cells are positioned within the Sheet, it’s possible you’ll must scroll down till you see it. Once you see it, hover over the “View extra cell actions” to open up one other menu.
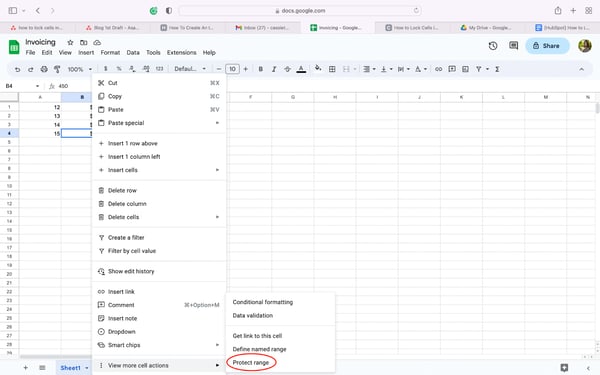
3. Choose “Shield vary.”
The following menu will provide you with a number of extra cell actions. Search for the motion labeled “Shield vary.” Select “Shield vary” to start assigning cells to a locked standing.

Alternatively, you’ll be able to carry out the identical process by clicking on the Knowledge tab and selecting “Shield sheets and ranges.”
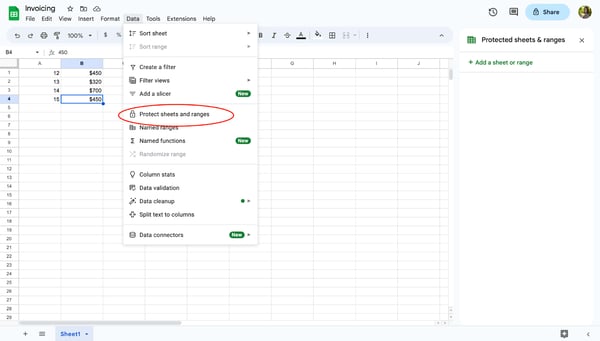

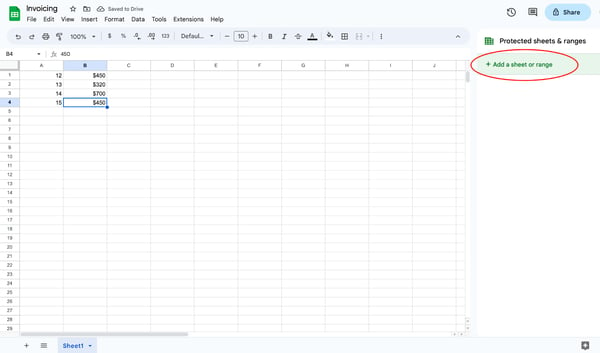
4. Select “Add a sheet or vary” from the facet panel.
After clicking “Shield vary” from the dropdown menu or “Shield sheets and ranges” from the Knowledge tab, you’ll discover the open facet panel on the fitting of your display. Click on on “Add a sheet or vary.”

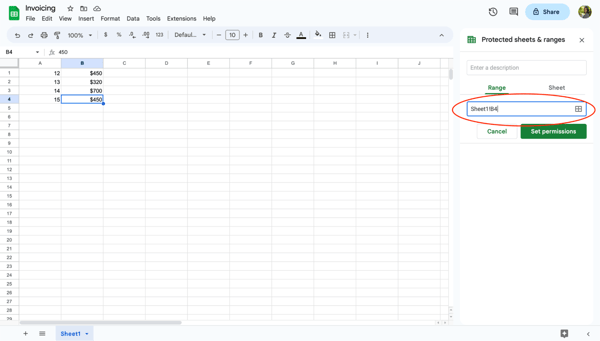
5. Select which cells to lock.
Subsequent, resolve which cells to lock from enhancing. In case you click on the cell you wish to lock, that cell’s data might be referenced within the vary part. If you’ll want to lock a spread of cells, enter the vary into the sphere.
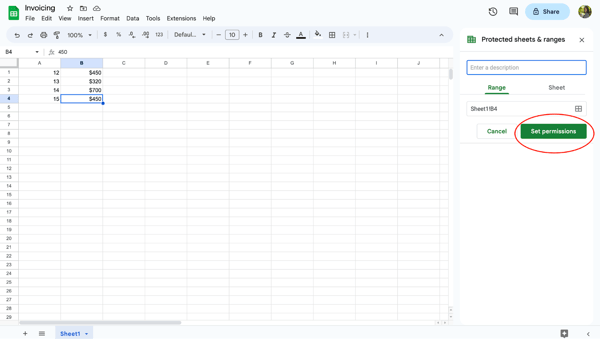
6. Choose “Set permissions.”
Choose “Set permissions” to decide on who can edit the chosen cells. In case you’re the one individual allowed to edit the cell, ensure you select “solely you.”
You may as well copy permissions from different sheets, when you have locked cells in different Sheets.

7. Choose “Finished.”
When you’re completed locking cells from enhancing, click on “Finished” to avoid wasting your preferences. Now, these cells are locked from enhancing till you unlock them and alter the settings.

Methods to Lock Cells and Give Enhancing Permission to Choose Customers
In case you and your staff are working in a Google Sheet, contemplate giving enhancing permissions to pick out customers. It will assist you to assign duties and higher handle your challenge and hold others from by accident deleting vital work.
To lock cells and provides enhancing permission to pick out customers, observe these steps.
1. Proper-click the chosen cells.
Select the cell or cells you want to limit. Then, right-click to open up the dropdown menu.
2. Hover “View extra cell actions.”
Scroll or look to the underside of the dropdown menu and hover over “View extra cell actions.” It will open one other menu in your display.
3. Choose “Shield vary.”
To vary a cell’s enhancing standing, select “Shield vary.” This motion will open a facet panel menu.
4. Click on “Add a sheet or vary” from the facet panel.
Within the facet panel, click on “Add a sheet or vary.” Clicking this button will will let you enter which cells or sheets to lock.
5. Select which cells to lock.
Decide which cells your staff member must carry out their assigned process. Then, enter the vary of cells into the field.

6. Choose “Set permissions.”
When you’ve entered the specified cells within the field, you’ll must set enhancing restrictions. To limit entry to the vary of cells, click on “Set permissions.”
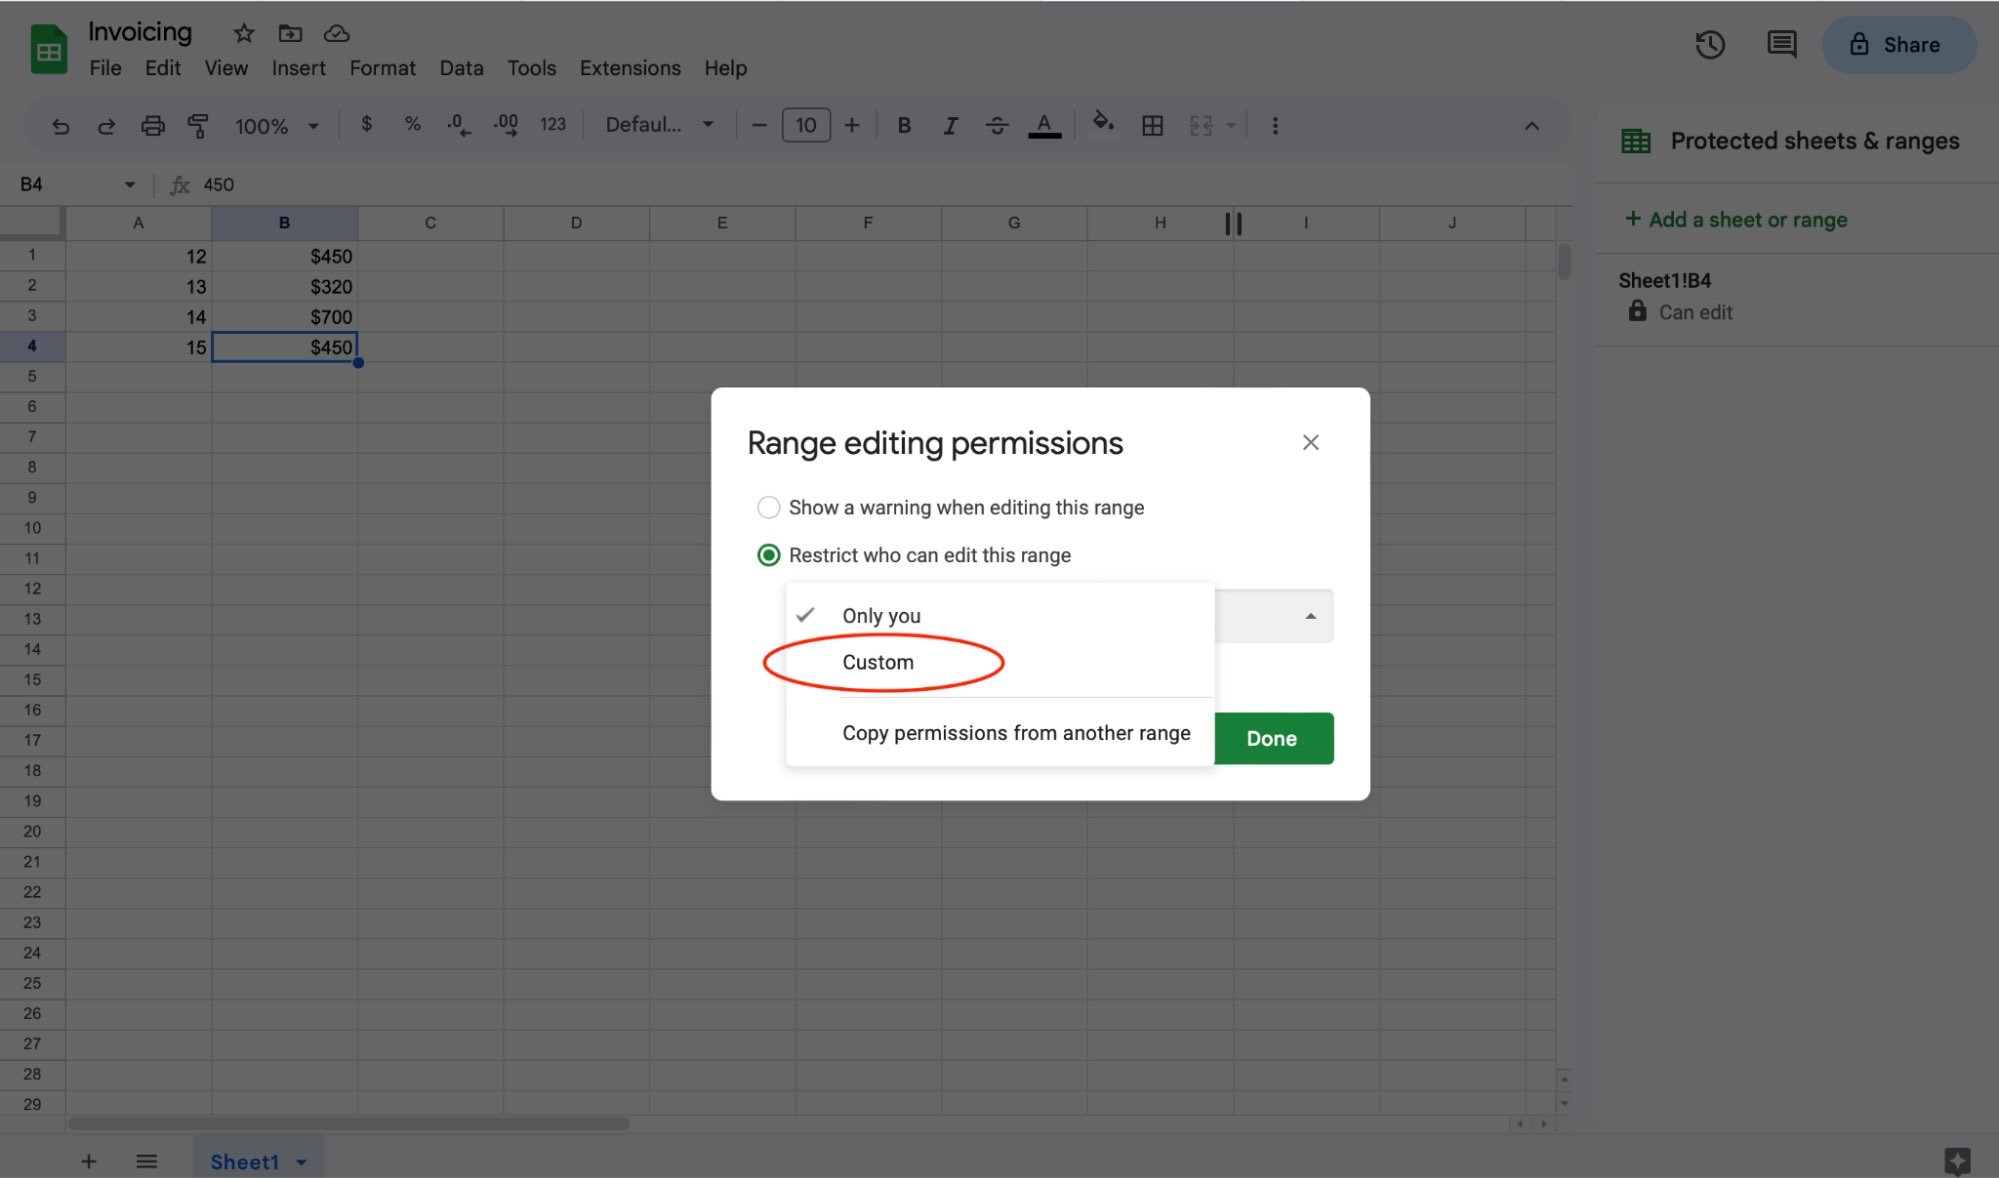
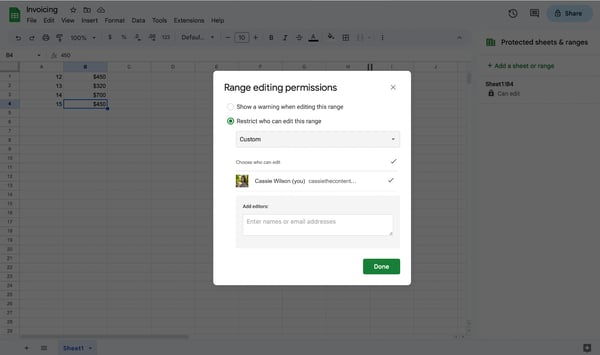
7. Select “Customized.”
From this display, you may have the choice to resolve who has permission to edit the vary of cells. So as to add a staff member or a number of staff members, click on “Customized.”

8. Assign editors to cells.
Now, you’ll be able to resolve who wants enhancing entry to the vary of cells you may have specified. Enter the e-mail addresses of your staff members to assign them as editors of the cells. It will give them enhancing entry to designated cells throughout the sheet.
Make sure to click on “Finished” to avoid wasting the vary enhancing permissions.

Methods to Lock an Whole Sheet
There could also be instances you will want to lock a complete sheet from enhancing. Fortunately, this can be a easy course of.
To lock a complete sheet, you’ll be able to right-click on any cell throughout the doc to open the dropdown menu. You’ll take the identical steps to lock a complete sheet as you probably did with locking only one cell.
Right here’s methods to do it:
1. Proper-click on any cell.
Proper-click on any cell in your Google Sheet to open a drop-down menu. To lock a complete sheet, it doesn’t matter which cell you employ to do that.
2. Hover over “View extra cell actions.”
Select the “View extra cell actions” choice on the backside of the dropdown menu. You don’t want to click on. Simply hover over it to open one other menu.
3. Choose “Shield vary.”
Click on “Shield vary” to open the permissions facet panel. Alternatively, you’ll be able to attain the “Protected sheets and ranges” facet panel by clicking on the Knowledge tab and deciding on “Shield sheets and ranges.”
4. Select “Add a sheet or vary” from the facet panel.
Click on “Add a sheet or vary” to start locking a complete sheet.
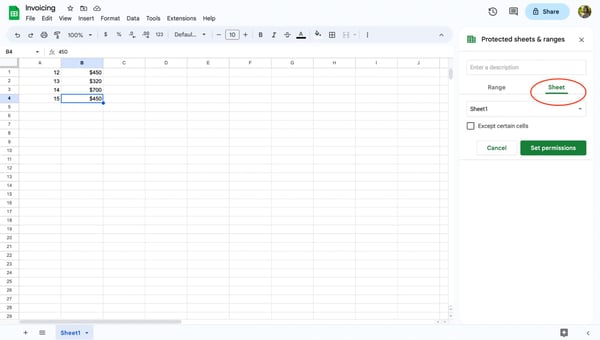
5. Click on on “Sheet.”
Click on on the “Sheet” button to lock a complete sheet. When you’re within the Sheet tab, choose which Sheet you want to lock.
ou have the choice to exclude sure cells from being locked. In case you want sure cells open for enhancing, click on the field for “Besides sure cells” and specify the vary.

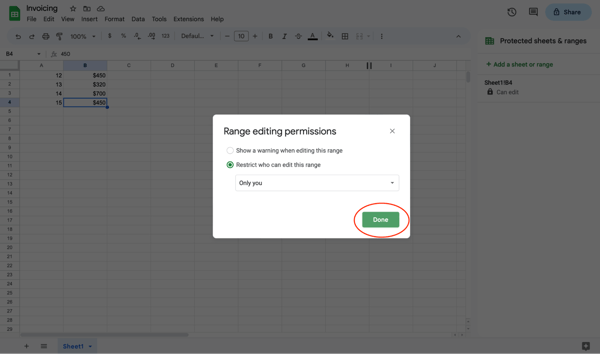
6. Choose “Set permissions.”
Earlier than you’ll be able to lock your Sheet, you’ll want to set enhancing permissions. Choose “Set permissions” to decide on who can edit the locked Sheet. In case you are the one individual allowed to edit the sheet, ensure you select “Solely you.”
When you’ve decided who has enhancing permissions to your Sheet, both simply you or members of your staff, make sure you hit “Finished” to avoid wasting the permissions. Now your Sheet is locked and can’t be edited with out permission.
Methods to Present a Warning however Enable Enhancing of Locked Cells
In case you’re engaged on a doc concurrently with staff members and also you don’t need your cells to be modified, you’ll be able to enable customers to obtain a warning earlier than accepting their edits.
To point out a warning, observe these steps:
1. Proper-click on the cells you wish to lock.
In your Google Sheet, right-click on the cells you wish to lock. You possibly can set a warning for a complete Sheet by following this course of as properly.
2. Hover over “View extra cell actions.”
Scroll to the underside of the menu and hover over “View extra cell actions.”
3. Choose “Shield vary.”
To set an enhancing warning on sure cells or your Sheet, click on “Shield vary” to assign cells or a Sheet to a warning standing.
4. Select “Add a sheet or vary” from the facet panel.
On the fitting of your display, you will notice an open facet panel menu. Click on “Add a sheet or vary.”
5. Select which cells or sheet to set an enhancing warning.
You possibly can set an enhancing warning for a spread of cells or a complete sheet. Within the facet panel, decide which cells or sheets want a warning and ensure the knowledge referenced within the field matches your required cells or sheet.
6. Choose “Set permissions.”
After you may have verified which cells or sheets ought to have an enhancing warning, click on “Set permissions” to go to the enhancing choice display.
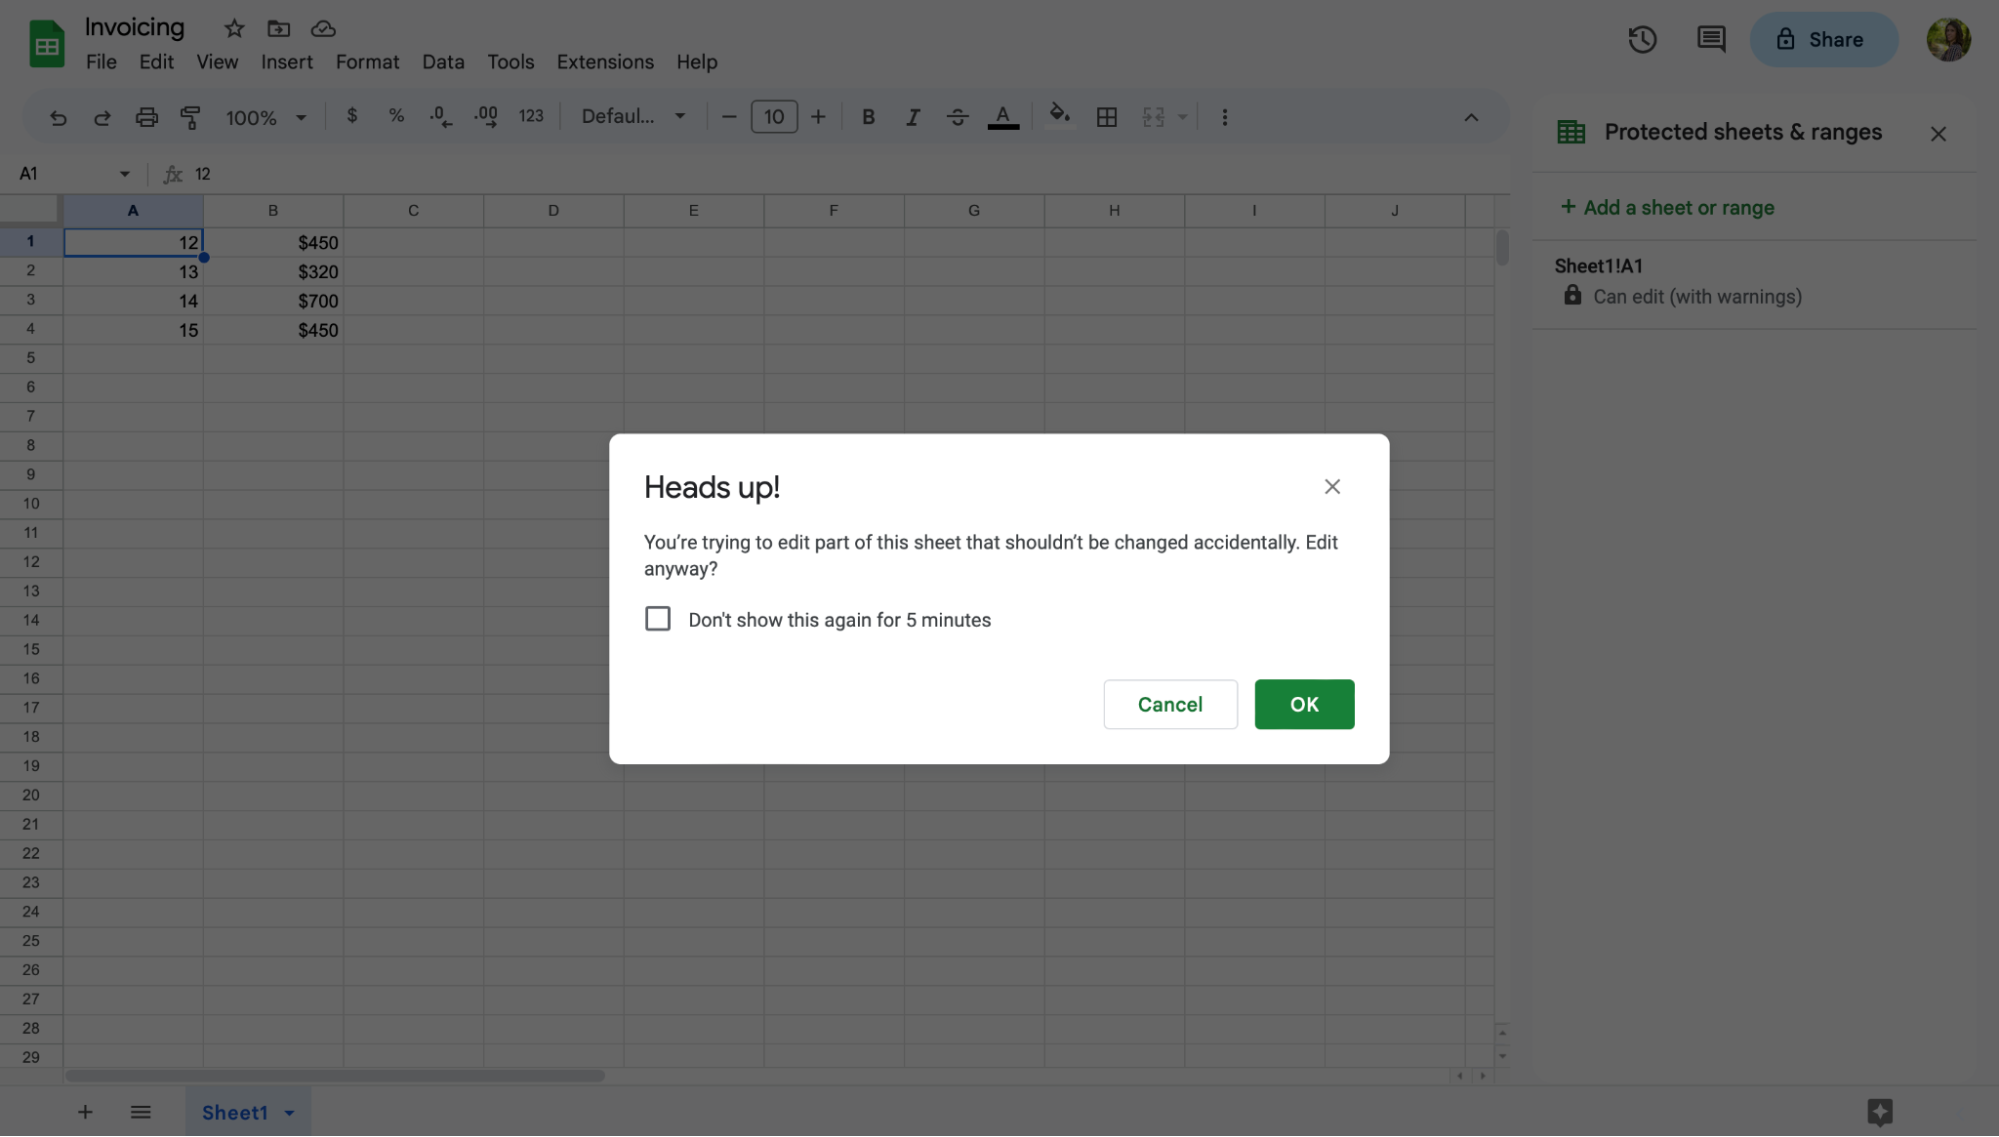
7. Select “Present a warning when enhancing this vary.”
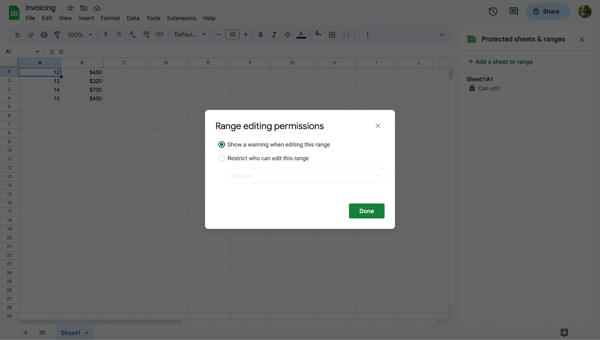
Choose “Present a warning when enhancing this vary,” then hit “Finished” to avoid wasting your enhancing permissions.
If a consumer tries to make adjustments within the semi-locked cell or Sheet, they are going to obtain a warning message as a heads-up. Customers should both click on “Cancel” or “Okay” to make adjustments or revert to the unique doc.

Methods to Unlock Cells
Locking a cell or a Sheet is extraordinarily useful in sustaining the integrity of your information. However, there might be instances when you will want to unlock a cell to replace or change the knowledge inside it.
Now that you just perceive methods to lock cells, let’s check out methods to unlock them.
1. Proper-click on the cells you wish to unlock.
In your Google Sheet, right-click on the cell you’ll want to unlock. This motion opens a dropdown menu.
2. Hover over “View extra cell actions.”
Search for the “View extra cell actions” choice within the drop-down menu. This selection is positioned on the backside of the dropdown menu. Once you discover it, hover your mouse over the motion.
3. Choose “Shield vary.”
Like locking a cell, you’ll nonetheless must click on on the “Shield vary” choice. It will open a facet panel menu the place you’ll be able to select to unlock the cell.
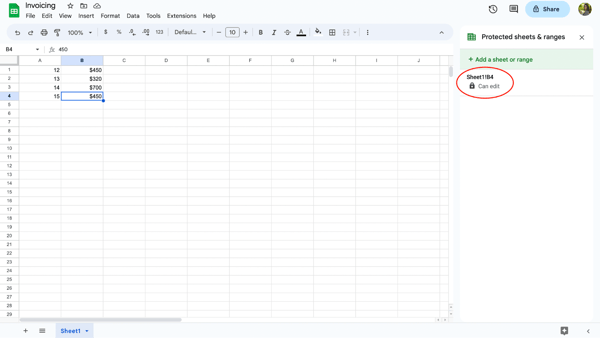
4. Click on on the locked cell.
Within the facet panel menu, you will notice a listing of locked cells inside your Sheet. Click on on the cell or cell vary that you just want to unlock.

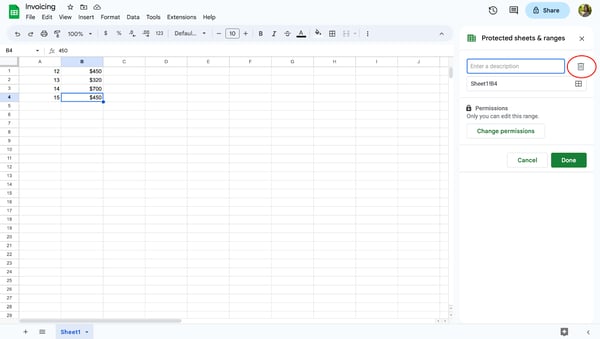
5. Click on the garbage can icon.
Subsequent, click on on the garbage can icon to the facet of the outline field.
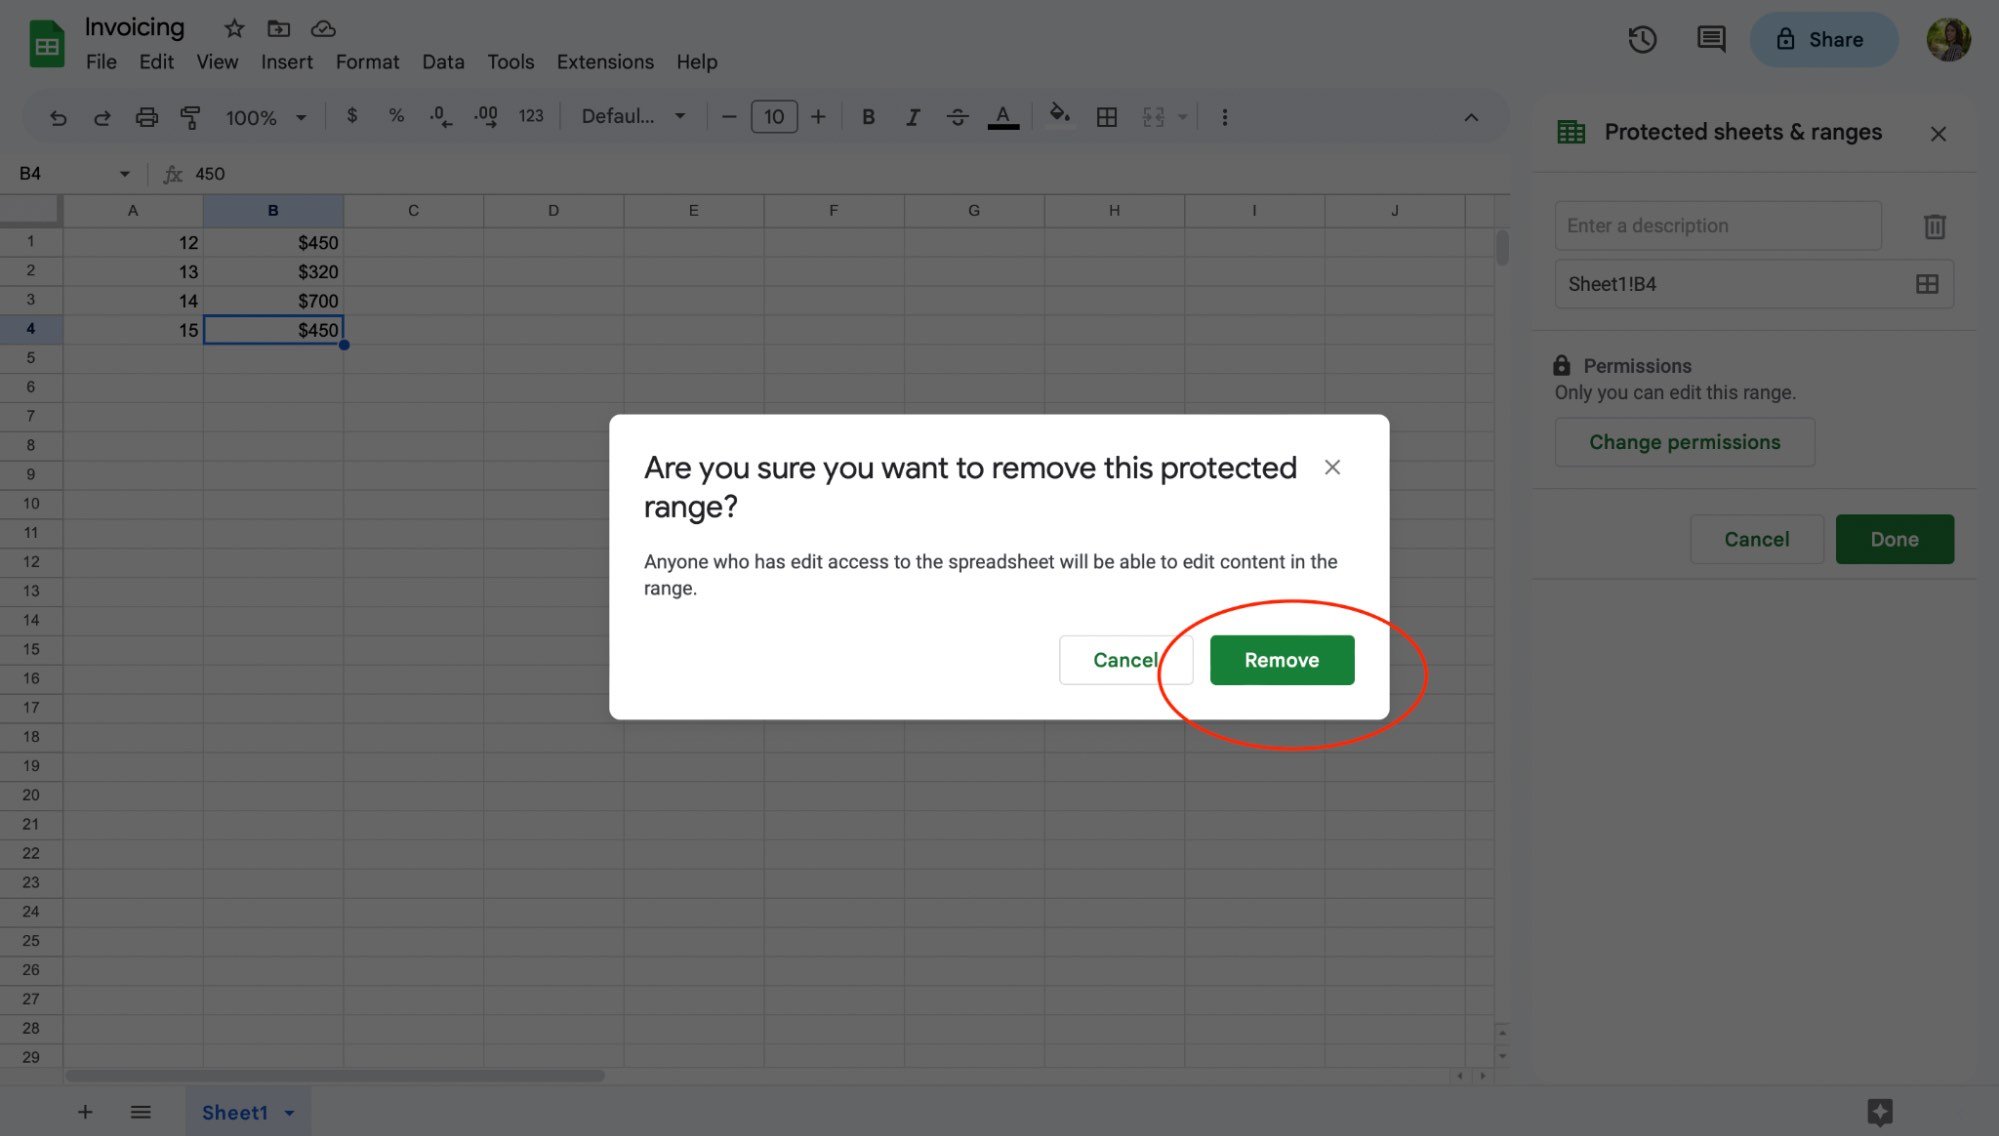
6. Choose “Take away.”
A warning display will pop up asking if you wish to take away the protected vary. In case you are certain you wish to unlock the cell, click on the “Take away” button.
When you click on the button, your cell is free to be edited by anybody with enhancing permission for the doc.
Locking Cells in Google Sheets
And there you may have it! Make sure to take a while to set enhancing preferences and assign sure cells or sheets to your staff.
When you’ve executed that, you and your staff can confidently work on the identical Google Sheet with out worrying somebody will by accident edit or delete vital data.