
Excessive-quality movies require a starting stage the place you determine, arrange, and optimize all of the features you need to characteristic on the completed product. Whether or not it’s a film, a YouTube present, or a branded video advertising piece, after we watch nice video content material, we’re the results of a prolonged inventive manufacturing course of.
And probably the most vital instruments professionals use to get there’s the storyboard.
Storyboards are all about serving to with the short conceptualization of concepts, working as a sequence of illustrated scene references within the type of vignettes and arranged to fit your video’s final narrative.
Nonetheless, getting probably the most out of this device requires you to know what it’s (and isn’t) for, because it’s pretty straightforward to waste important effort and time on one thing that’s merely there that can assist you keep away from troubles and polish the completed piece.
So, how do you go about making a really helpful storyboard? Hold studying, and also you’ll be taught the ins and outs of making one which helps you make a video like the professionals!
Instruments of the commerce: The various kinds of storyboards
Broadly talking, there are three kinds of storyboards you need to use these days: hand-drawn storyboards, digital storyboards, and thumbnail storyboards.
The hand-drawn methodology is the normal and oldest storyboard method
With a pencil, a clean sheet, and a sequence of easy sketches, you need to use it to construct references based mostly in your preliminary ideas on how the video ought to move—method earlier than animating or filming any scene.
Whereas historically important, working this device by hand presents extra troubles than it solves, requiring numerous effort and time to return and tweak or change issues. So, we’ll be largely specializing in the digital method of doing issues shifting ahead.
Digital storyboards have change into the go-to in most kinds of productions, however particularly for animated tutorial video tasks
With this method, you need to use software program to customise graphics and colours and ensure that all of the scenes, characters, and notes are well-placed.
Most significantly, a digital setup makes it extraordinarily straightforward to vary and adapt your storyboard as you progress ahead throughout the pre-production phases of your video—which supplies you much more flexibility to start out sprucing components of your video even earlier than you progress on to manufacturing.
Lastly, you’ve gotten thumbnail storyboards
These are largely used for easy tasks provided that they’re shortly made and simple to compile because it doesn’t require a lot textual content or detailed data, only a few attracts to visualise core concepts in sequential order.
This sort of storyboard is usually meant to function a fast visible reference of your undertaking’s move and isn’t actually there to offer a strong manufacturing device.
Studying to make pro-level storyboards
Making a video is already a problem in itself, however while you plan on creating one, storyboards change into a key a part of that planning course of. By engaged on one, you could find new and attention-grabbing methods to construction your preliminary concepts right into a sequence of scenes that make up a compelling remaining video.
However an excellent, helpful storyboard requires greater than only a few sketches in a sequence of squares! So let’s take a better take a look at how professionals construct a dependable storyboard.
First step: Outline the overall thought of the video
Earlier than beginning together with your storyboard, you’ll first need to outline the aim of your video. It’s not clever to start out drawing scene concepts with out having a transparent notion of your goals and targets for this piece of content material.
Planning an efficient video requires critical preparation. For instance, if you wish to create a storyboard for a video to advertise a product, the primary objective could be showcasing that product in visually compelling methods. In case you are making an animated explainer video for a teamwork seminar, the core objective could be to speak your data in easy and entertaining methods.
Since storyboarding happens in the course of the planning phases earlier than you begin manufacturing, it’s vital to ascertain what you need to accomplish together with your video and why it’s going to enchantment to your viewers.
That’s to say, it’s essential perceive the kind of video you’d wish to make in an effort to method the storyboarding course of otherwise, constructing scenes that make sense for that kind of video.
As soon as that’s taken care of, you need to use that data as pointers on your storyboard’s sketches. This can provide help to decide issues like framing, digicam angles, zoom, lighting, transitions, and different data you’d like to incorporate as you begin crafting the important thing scenes that may make up your storyboard.
Second step: Checklist the key scenes you need to embrace within the video
As soon as you understand what you’re going for together with your video, it’s endorsed to construction all the key scenes you’ll need to characteristic in an inventory. These would be the constructing blocks that may make up your storyboard (and, finally, your video!)
Begin with an entry on your opening scene, after which transfer on to including each main scene after it till you attain your closing display. Attempt to embrace a particular entry for every main scene or sequence in your video, and attempt to be as clear as doable in your fast descriptions in order that it’s straightforward to observe in a while when you’re placing collectively after which modifying your piece.
Upon getting the complete checklist of the key scenes you need in your video, begin including to the checklist all the key actions, characters, transitions, and extra data that you simply intend to make use of in your video. What characters are concerned? What actions are they performing? The place? Why?
Make notes below every particular scene entry in your checklist. Be clear, however be temporary. Bear in mind, that is purported to act as a tenet to construct your storyboard, not an alternative to your script or director!
Along with these particulars, you will make an observation of all of the technical features which might be a part of every scene creation. Issues like shot composition, sound results, gear concerned, lighting results, and even digicam motion references.
Now, you’ve gotten a bunch of written concepts and scene directions that present a reasonably clear thought of what your video might be. It’s time to start out determining what that appears like!
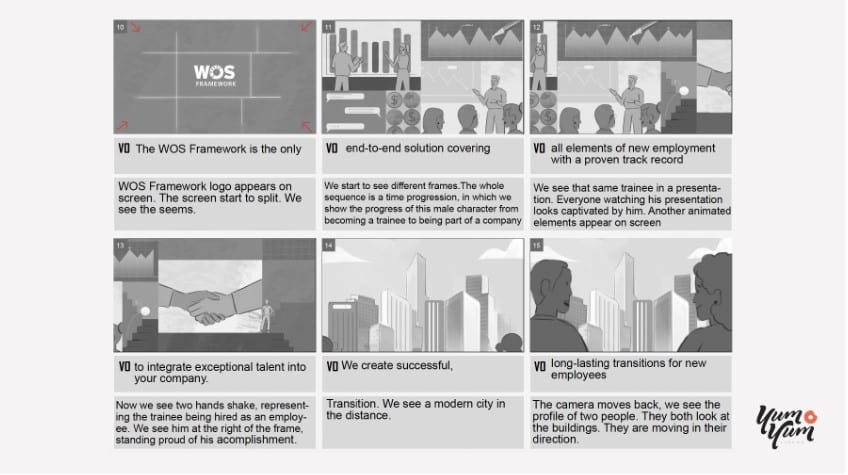
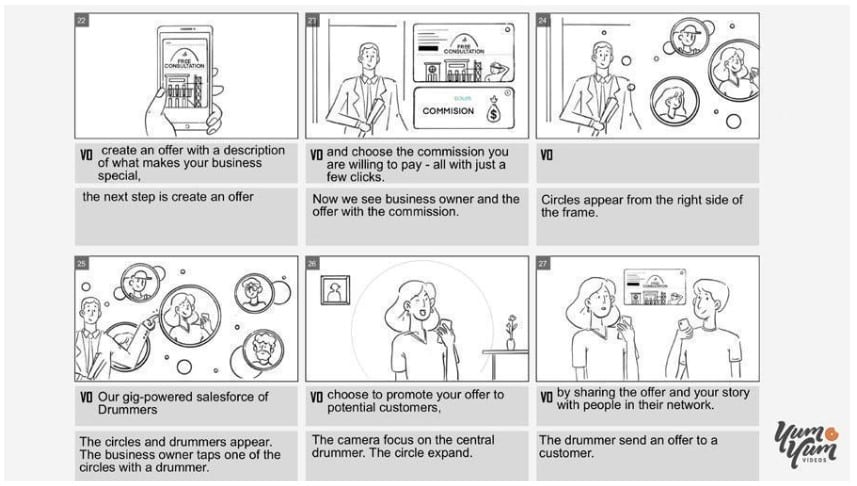
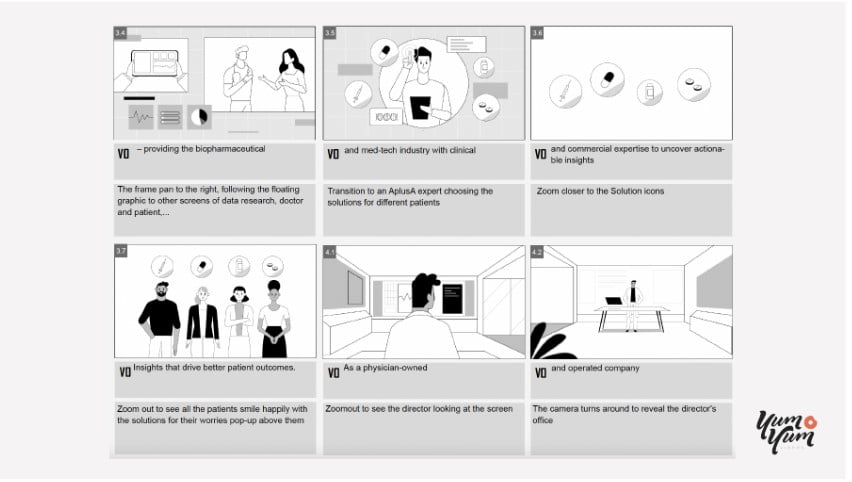
Take a look at the completed video and see how the sketches translate into the ultimate piece:
Third step: Roll up your sleeves; it’s sketch time
Upon getting listed the sequence of scenes you need, it’s time to start out drawing the visible references that may comprise your storyboard. The entire purpose right here is to plan out the story visually, however solely as a reference.
Begin creating evocative pictures in a sequential order to arrange your video’s narrative within the type of vignettes, following the checklist you already put collectively. Draw shapes that signify every of the characters and key occasions that may come into play in every of the scenes.
You don’t must waste time making an attempt to make each sketch visually gorgeous; solely correct sufficient to be as helpful as doable as soon as you progress on to manufacturing.
You should utilize easy-to-read components like ovals, traces, squares, triangles, thought clouds, and all the things it’s essential obtain your targets and convey your concepts for every scene. You can too use AI drawing instruments that can assist you visualize and refine your designs, or increase on the concepts you have already got.
Take this step as a solution to take a look at your video’s expectations. Decide if the visible narrative you might be constructing expresses the aim you had within the first place. If it doesn’t, that is additionally the time to tweak, add, take away, and alter scenes to start out refining your video—the place your storyboard will get to shine as a manufacturing device!
This step can be helpful to assist optimize your assets. Is there one thing that doesn’t make a lot sense? Perhaps you forgot a element or made a mistake whereas drafting your scene checklist. Is there a scene that may require extra gear or time to provide?
Sketching and altering your storyboard offers you the proper alternative to determine these challenges and anticipate these wants.
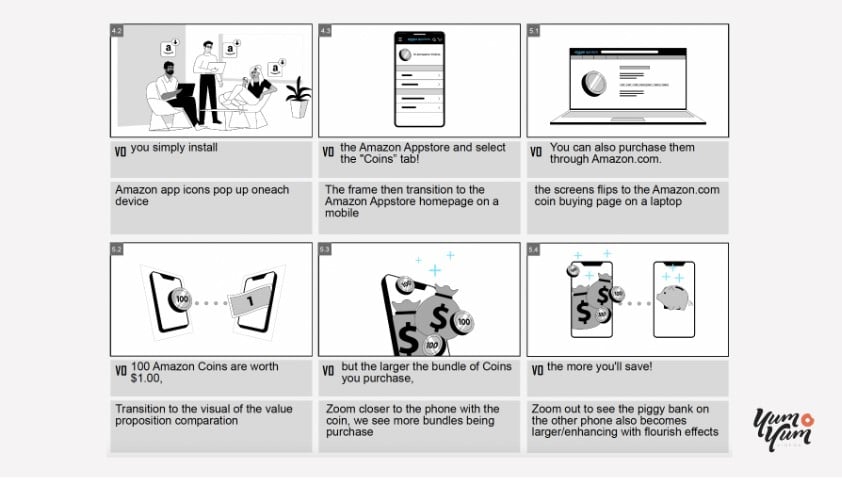
Take a look at the completed video and see how the sketches translate into the ultimate piece:
Fourth step: Leverage context cues to take advantage of out of your storyboard
By now, your storyboard is almost accomplished. You’ve got recognized all the key scenes, actions, and characters that play key roles in your video, together with the extra data and the illustrated representations.
However how will you guarantee this device will provide help to probably the most as soon as you progress into manufacturing?
Properly, there are a couple of further context components you’ll need to add to your storyboard earlier than you name it achieved. Design components that may make clear your unique intent and can make the entire device extra readable shifting ahead.
- First, implement directional arrows into your storyboard. They’re usually used to point how the angle or a personality is shifting by a scene. Draw a few of them to provide the motion impact and provide help to make clear no matter digicam motion notes you have already got.
- Second, including details about related components and interactions between characters in every scene. Your sketch may depict two buddies in a bar. Now, they could kiss, or they could struggle. Since each of these scenes wouldn’t share the identical ambiance, you’ll want to add these kinds of particulars under the sketch. This fashion, it will likely be simpler to distinguish the acts that happen in a scene past the situation depicted in your storyboard sketches.
- Third, it’s additionally handy to put in writing temporary descriptions and referential notes under every panel of the storyboard. Thus, you may specific in a easy method what you may’t present together with your drawings. Perhaps one of many characters has a high-pitched voice, or possibly there’s no dialogue in any respect and only a creepy background tune. Making notes on these components ought to provide help to preserve all the things so as as soon as you progress on to manufacturing and even provide help to discover alternatives so as to add issues like branded components or sequences that reinforce your video’s targets.
Apart from all the data that you simply already illustrated, these remaining components are all about serving to you get your concepts throughout. They enhance the standard of your storyboard by serving to you shortly work out how the photographs will move collectively all through the whole piece, which can prevent numerous complications as soon as the cameras are rolling and the illustrators are drawing!
To sum issues up
You don’t must be an ideal design artist to create an excellent high quality storyboard as a result of the drawing doesn’t must be so detailed.
The vital factor is that it conveys what you need to present in your video, in a easy method, by expressing the details, just like the sounds, narrative, and actions to perform the intention, that’s: your video.
Be sure you preserve it easy so everybody can perceive the method behind your considering and develop a storyboard exploring the other ways to start out crafting your panels for visualizing your remaining idea to your clients!